Create a Web Map Application in Under 6 Minutes

I've recently written a series of blog posts on how to quickly add a map to your mobile applications. Today, we’re going to do the same for web applications, using the HERE JavaScript API. Start your stopwatches, here we go!
Adding a map to your web application is a six-step process. Each of these steps can be completed in a minute or less.
- Get your API key
- Load the SDK Library and Style Sheet
- Create a div for the Map
- Create a Platform Instance
- Initialize the Map
- Enable Map Interaction and the Default UI
Let me quickly(!) walk through all of these steps.
Step 1: Get Your Credentials
First you need to sign up on the developer portal and generate an API Key! Just click on "Sign up" on the top-right of this page and follow the process. My colleague Michael has made a video in case you need help. (Which you don’t. Go ahead, you got this.)
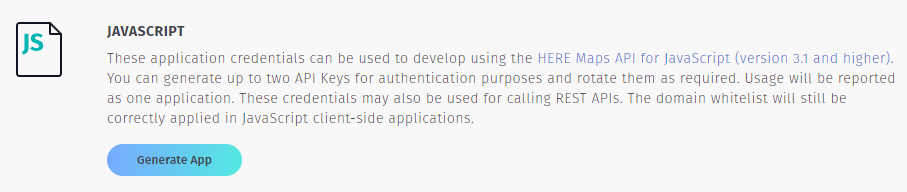
Once you've signed up, you will be taken to your project page. There, find the “JavaScript” section and click on “Generate App”.
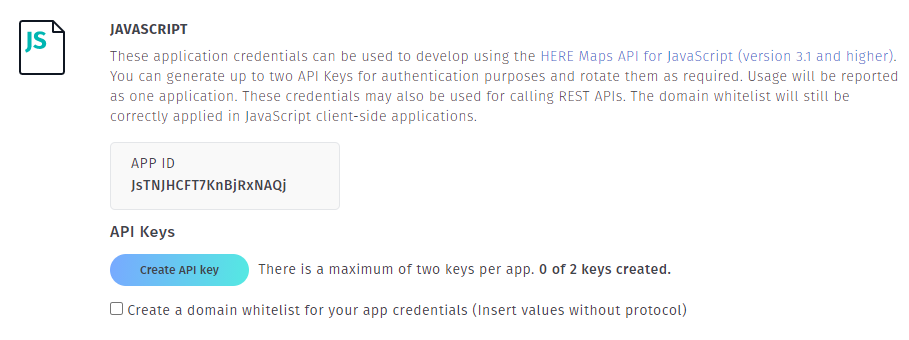
Once your app has been created, click “Create API key”. Copy and store the key that will be created, as we will need it in Step 4.
Tip: If you want to beat the clock, you can just skip ahead to the bottom of the blog post and copy-paste the final app. Just add your credentials where we instantiate the Platform object. That should give you a sweet, full-screen map app and 4 minutes of your life back!
Step 2: Load the SDK Library and Style Sheet
Add the following to the <head> tag of your application, to the load the SDK libraries for the map as well as the CSS style for the default user interface.
<script type="text/javascript" src="https://js.api.here.com/v3/3.1/mapsjs-core.js"></script>
<script type="text/javascript" src="https://js.api.here.com/v3/3.1/mapsjs-service.js"></script>
<script type="text/javascript" src="https://js.api.here.com/v3/3.1/mapsjs-ui.js"></script>
<script type="text/javascript" src="https://js.api.here.com/v3/3.1/mapsjs-mapevents.js"></script>
Step 3: Create a div for the Map
Add a <div> tag to the body of your application. This element is where your map will live. Give it a good, solid name. Like “map”. Or “herbert”. Your choice.
<div id="map"></div>
Step 4: Create an Instance of the H.service.Platform Object
H.service.Platform is the central class of the HERE JavaScript API. Among other things it holds the credentials, which we generated in Step 1. So, grab your apiKey and create a Platform instance as follows.
    var platform = new H.service.Platform({
      apikey: 'YOUR_API_KEY_HERE'
    });
Step 5: Initialize the Map
To initialize the map itself, we first need to create a set of default layers. These are the various layers available on the map, such as satellite imagery and traffic information. Then we need to create an instance of H.Map (which you’ve probably guessed is our actual map object) and pass it the div and the the default layers we’ve created. We can also pass in additional parameters, such as a location to center the map on (in latitude and longitude format) and a zoom level. Copy and paste the following code into your app.
    var defaultLayers = platform.createDefaultLayers();
    var map = new H.Map(document.getElementById('map'),
      defaultLayers.vector.normal.map, {
      center: { lat: 40.71, lng: -74.01 },
      zoom: 15
    });
Step 6: Enable Map Interaction and the Default UI
To be honest, we’re already done. If you run your app, you should see a map! Congrats. However, the map will be static (that is you can’t move it, zoom or interact in any way with it) and there won’t be any user interface buttons (for example to change map layers) either. That’s not cool, so let’s quickly enable interaction on the map and add a nice default user interface with two quick lines of code.
    var behavior = new H.mapevents.Behavior(new H.mapevents.MapEvents(map));
    var ui = H.ui.UI.createDefault(map, defaultLayers);
Bonus Round
Let’s be honest, some of these steps took a lot less time than a minute. In fact, I estimate that step 3 took you about 7.3 seconds. So, let’s use our remaining time for some optional tips and clean-up.
First, if you change the size of your browser windows, you might notice that the size of the map doesn’t change with it. Sometimes that’s cool, but usually we want the map to play along. By adding the following line of code, we can ensure that the map plays nice.
window.addEventListener('resize', () => map.getViewPort().resize());
Second, you can change the size of the map by styling your div. Here’s an example of a style that gives you a proper full screen map with no borders or weird padding.
    body,
    html {
      border: 0;
      padding: 0;
      margin: 0;
    }

    #map {
      width: 100vw;
      height: 100vh;
    }
The Complete Code
Whether you skipped ahead or not, here’s the full code of a simple web app displaying a full-size map. Just copy-paste, add your apiKey to the Platform object instantiation and you’re good to go!
<!DOCTYPE html>
<html>
<head>
<title>Create a Web Map Application with JavaScript in Under 5 Minutes</title>
<!-- Step 2: Load the SDK library and style sheet -->
<script type="text/javascript" src="https://js.api.here.com/v3/3.1/mapsjs-core.js"></script>
<script type="text/javascript" src="https://js.api.here.com/v3/3.1/mapsjs-service.js"></script>
<script type="text/javascript" src="https://js.api.here.com/v3/3.1/mapsjs-ui.js"></script>
<script type="text/javascript" src="https://js.api.here.com/v3/3.1/mapsjs-mapevents.js"></script>
<!--Bonus Round: this styling will result in a full screen map --><!--Step 3: Create a div for the map-->
<div id="map"> </div>
<script>
// Step 4: initialize the HERE map platform
var platform = new H.service.Platform({
// Use the apiKey you generated in Step 1 here
apikey: 'YOUR_API_KEY_HERE'
});
// Step 5: Initialize the map in the "map" div
// This map is centered on New York, using the default map style
var defaultLayers = platform.createDefaultLayers();
var map = new H.Map(document.getElementById('map'),
defaultLayers.vector.normal.map, {
center: { lat: 40.71, lng: -74.01 },
zoom: 15
});
// Step 6: Enable the event system and add default interactions (e.g., zoom)
// Create the default UI components (e.g., zoom buttons)
var behavior = new H.mapevents.Behavior(new H.mapevents.MapEvents(map));
var ui = H.ui.UI.createDefault(map, defaultLayers);
// Bonus Round: add a resize listener to make sure that the map occupies the whole container
window.addEventListener('resize', () => map.getViewPort().resize());
</script>
</body>
</html>
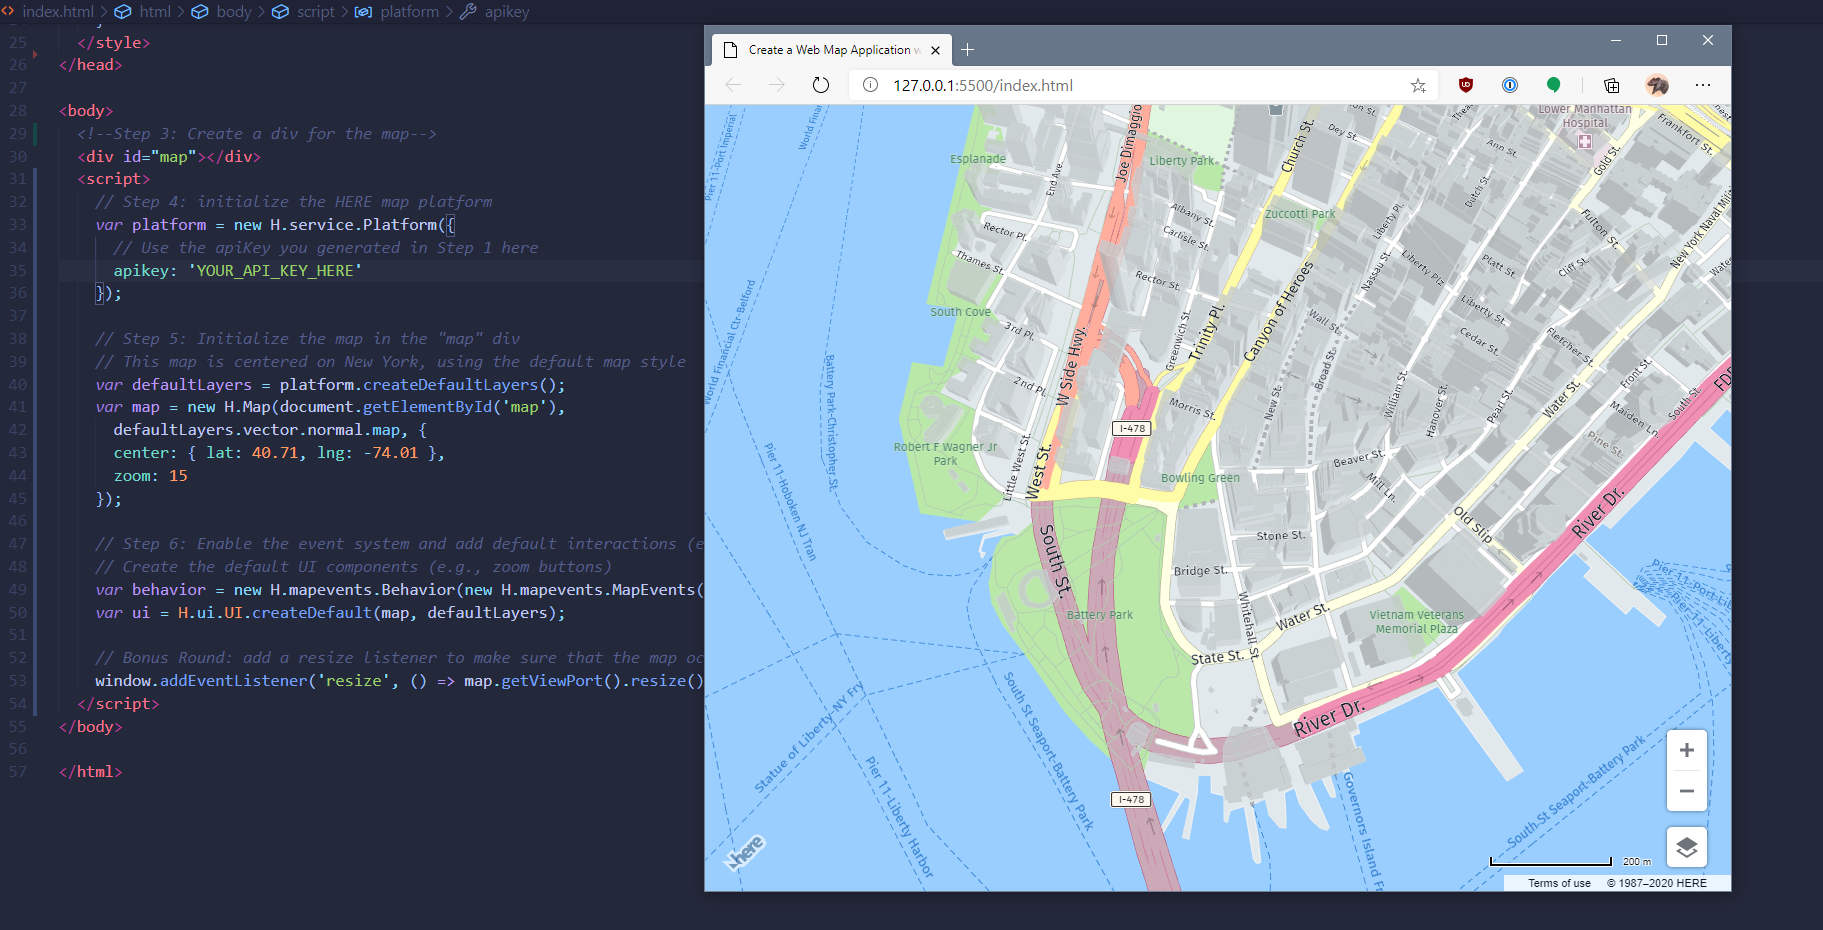
Finally, here's a look at the result in action!

Have your say
Sign up for our newsletter
Why sign up:
- Latest offers and discounts
- Tailored content delivered weekly
- Exclusive events
- One click to unsubscribe