- Products ProductsLocation Services
Solve complex location problems from geofencing to custom routing
PlatformCloud environments for location-centric solution development, data exchange and visualization
Tracking & PositioningFast and accurate tracking and positioning of people and devices, indoors or outdoors
APIs & SDKsEasy to use, scaleable and flexible tools to get going quickly
Developer EcosystemsAccess Location Services on your favorite developer platform ecosystem
- Documentation
- Pricing
- Resources ResourcesTutorials TutorialsExamples ExamplesBlog & Release Announcements Blog & Release AnnouncementsChangelog ChangelogDeveloper Newsletter Developer NewsletterKnowledge Base Knowledge BaseFeature List Feature ListSupport Plans Support PlansSystem Status System StatusLocation Services Coverage Information Location Services Coverage InformationSample Map Data for Students Sample Map Data for Students
Route Overview
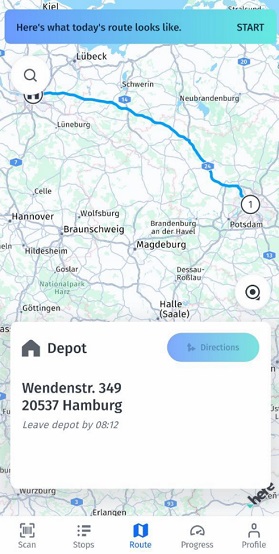
Once you have logged in and performed the first setups, you are presented with the Map view with the Route menu selected by default in the Route tab at the bottom of the screen. When a route is dispatched and assigned to you, you will see the pop-up at the top of the screen suggesting to start the route.
Before you start the route, you can swipe the route stops to view their details.
Alternatively, tap Stop List next to the Route button, to view the full list of the stops. Select the Returns tab to view the list of returns, if there are any. You can use this view any time during the route execution.
Also, if you tap the Progress button at the bottom of the screen, you can view the progress of the route execution divided by overall Stops, Pickups and Deliveries.
When you are ready to start, tap Start, you will see the Route overview screen.

The first stop is the depot, where you can pick up your orders for the day. Tap the navigation button to activate turn-by-turn navigation.
Note that if Location Tracking is enabled in your app, then it starts sending your location data to the dispatcher when you start the route.
Also note that you can anytime tap Scan at the left bottom to scan a barcode to proceed to a pickup or delivery for that specific item.
Once you reach the depot, tap on the Pickups to complete them.
Note that some orders may miss the exact address and the recipient name. Such orders are marked with the yellow exclamation mark in your Route Overview and on the map. You can check the missing information directly on the package, then tap the edit icon at the top right, and add the address manually. In this way you will be able to use turn-by-turn navigation for such orders.
In case you want to navigate to an address that is not part of a given route, you can use the search button on the top left of the screen. Please note that this functionality requires a network connection.