- Products ProductsLocation Services
Solve complex location problems from geofencing to custom routing
PlatformCloud environments for location-centric solution development, data exchange and visualization
Tracking & PositioningFast and accurate tracking and positioning of people and devices, indoors or outdoors
APIs & SDKsEasy to use, scaleable and flexible tools to get going quickly
Developer EcosystemsAccess Location Services on your favorite developer platform ecosystem
- Documentation
- Pricing
- Resources ResourcesTutorials TutorialsExamples ExamplesBlog & Release Announcements Blog & Release AnnouncementsChangelog ChangelogDeveloper Newsletter Developer NewsletterKnowledge Base Knowledge BaseFeature List Feature ListSupport Plans Support PlansSystem Status System StatusLocation Services Coverage Information Location Services Coverage InformationSample Map Data for Students Sample Map Data for Students
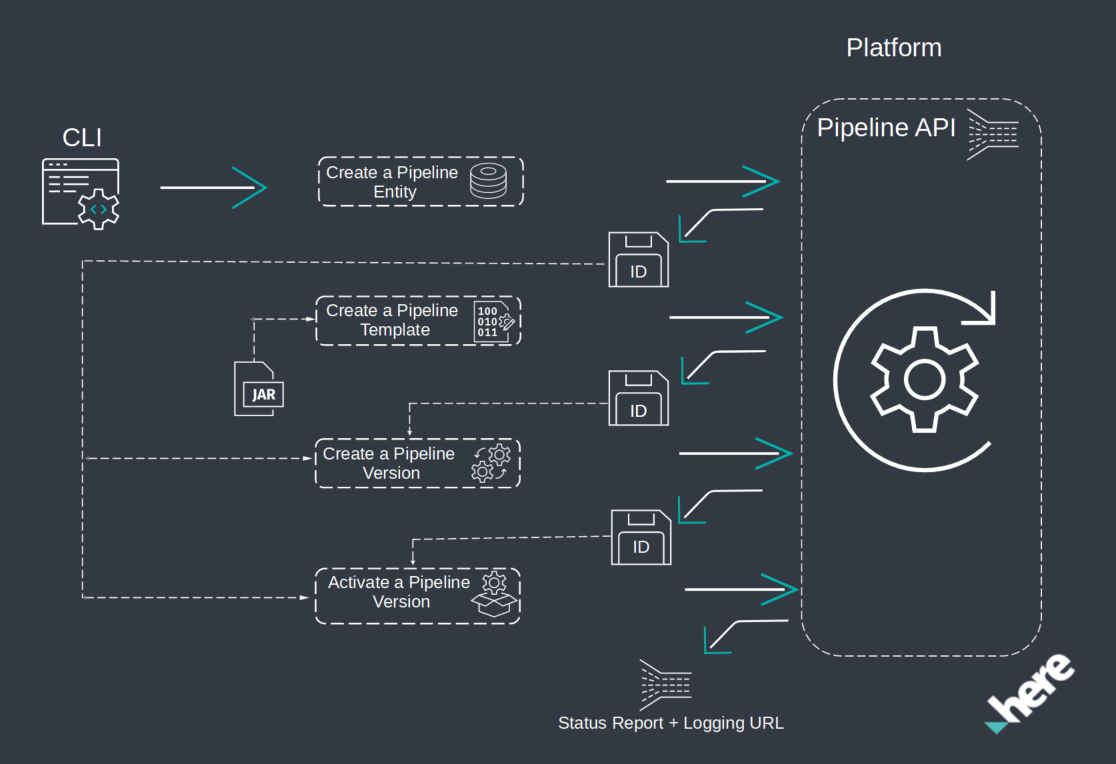
Pipeline workflows
The HERE platform uses data processing pipelines to process data from HERE geospatial resources and custom client resources to produce new useful data products. Data processing applications of different types can be deployed to the platform using the Pipeline API. For more information on Pipeline API, see here.
This workflow demonstrates how to deploy a pipeline within a project on the platform using the OLP CLI.
The OLP CLI provides tools for managing pipelines, such as:
- Prepare:
- Deploy:
For more details, see project commands and pipeline commands.
The figure below illustrates a workflow.
Create a project
Pipelines can be created in the group or in the project scope.
In this workflow, we create a pipeline within the project, as it is recommended to use projects to manage all the resources of the platform. A project is a container for the HERE platform resources you use to build an app, service, or other working product. It can contain resources such as catalogs, pipelines, schemas, and services. The project controls which users, apps, and groups can access the resources in the project. For more information about projects, see the Manage Projects documentation.
To create a project, run the following OLP CLI command:
olp project create <YOUR_PROJECT_ID> <YOUR_PROJECT_NAME>
The command creates a project and displays the project HRN. Note down this project HRN, as you need it later in the workflow.
Project hrn:here-cn:authorization::org:projectid has been created
Create a pipeline
Pipeline is the top-level entity in the HERE platform that groups the work of a user. During their work, users develop pipelines according to their specific purposes. For each pipeline, multiple versions can be stored and managed by the HERE platform.
Let's create a pipeline in the project scope using the olp pipeline create command with the --scope parameter.
olp pipeline create example-pipeline --scope <YOUR_PROJECT_HRN>
The command creates a pipeline, associates it with your specified project and displays the pipeline ID. Note down this pipeline ID, as you need it later in the workflow.
Pipeline has been created
ID: ec60ab85-a735-4dce-8413-b43cd5d5202a
Note
In case you create a pipeline using a group rather than a project and you receive an error message about the specified group ID, check the Platform Profile page to verify that you have used the correct group ID. Also verify that your app is part of that group. If you or your app do not belong to a group, ask your team or organization's administrator to assign you or your app to a group.
Create a pipeline template
Pipeline template is the immutable definition of an executable pipeline version and its run-time properties on the pipeline. It holds all the configuration information necessary to access, process, and store data. Besides, creation of an executable pipeline version is required in this workflow (see below). The pipeline template defines the actual run-time implementation of the pipeline and the input and output catalogs it will use. One pipeline template can be used by multiple pipeline versions at the same time, though the input and output catalogs used can be overridden in some jobs. To each template, the pipeline assigns a unique template ID (UUID) during creation.
Follow the steps below to create a new pipeline template.
-
First you need to choose the environment you want to run the application. Run the
olp pipeline environment listcommand to get the available environments.olp pipeline environment listThe command displays the following results.
ID                    name                               resource profiles          description
batch-2.0.0           Batch 2.0.0 (Deprecated)           HC1B, HM1B, HS1B           Spark 2.4.2, Java OpenJDK 8u262, Scala 2.11
batch-2.1.0           Batch 2.1.0 (Deprecated)           HC1B, HM1B, HS1B           Spark 2.4.2 With AWS SDK 1.7.4, Java OpenJDK 8u262, Scala 2.11
batch-3.0             Batch 3.0                          HC1B, HM1B, HS1B           Spark 2.4.7 With AWS SDK 1.7.4, Java OpenJDK 8u262, Scala 2.12
batch-4.0             Batch 4.0                          HC1B, HM1B, HS1B           Spark 3.4.1 With AWS SDK 1.12.262, Java OpenJDK 8u372, Scala 2.12
stream-2.0.0          Stream 2.0.0 (Deprecated)          HC1S, HM1S, HS1S           Flink 1.7.1, Java OpenJDK 8u312, Scala 2.11
stream-3.0.0          Stream 3.0.0 (Deprecated)          HC1S, HM1S, HS1S           Flink 1.10.1, Java OpenJDK 8u312, Scala 2.11
stream-4.0            Stream 4.0 (Deprecated)            HC1S, HM1S, HS1S           Flink 1.10.3, Java OpenJDK 8u312, Scala 2.12
stream-5.0            Stream 5.0                         HC1S, HM1S, HS1S           Flink 1.13.5, Java OpenJDK 8u312, Scala 2.12
The command lists all the runtime environments currently enabled for the user. Choose an available runtime environment and use its
IDin the command below. -
Enter the
olp pipeline template createcommand. Specify the template name, runtime environment (stream or batch), package, main class, a group that the pipeline belongs to, and input catalog IDs that are expected in the pipeline version configuration.For examples, see HERE Workspace for Java and Scala Developers.
LinuxWindowsolp pipeline template create "example-pipeline-template" batch-4.0 \ example-pipeline.jar com.here.pipeline.PipelineProcessor \ --input-catalog-ids optimized-map sensor-data --scope <YOUR_PROJECT_HRN>olp pipeline template create "example-pipeline-template" batch-4.0 ^ example-pipeline.jar com.here.pipeline.PipelineProcessor ^ --input-catalog-ids optimized-map sensor-data --scope <YOUR_PROJECT_HRN>The command creates a pipeline template and displays its ID. Note down this template ID, as you need it later in the workflow.
-
To verify the pipeline template, enter the
olp pipeline template showcommand.olp pipeline template show <YOUR_PIPELINE_TEMPLATE_ID> --scope <YOUR_PROJECT_HRN> --jsonThe command displays the following results.
{
  "created": "2018-03-30T12:40:39.577Z",
  "defaultClusterConfiguration": {
    "workerResourceProfileId": "HS1B",
    "supervisorResourceProfileId": "HS1B",
    "supervisorUnits": 1,
    "workerUnits": 1,
    "workers": 1
  },
  "name": "example-pipeline-template",
  "packageId": "ab8ea6b8-5a81-4070-9b84-ca4f28b67e22",
  "entryPointClassName": "com.here.pipeline.PipelineProcessor",
  "description": "",
  "id": "ac42c041-98ff-43d9-b0c3-0002fa756f49",
  "state": "creating",
  "defaultRuntimeConfiguration": "",
  "updated": "2018-03-30T12:40:39.577Z",
  "runtimeEnvironment": "batch-4.0",
  "inputCatalogIds": ["optimized-map", "sensor-data"]
}
Create a pipeline version
Pipeline version is an immutable entity representing the executable form of a pipeline within the HERE platform pipeline. Each pipeline version is created from a specific pipeline JAR file and pipeline template. To each pipeline version, the pipeline assigns its own pipeline version ID (UUID) during creation. Multiple pipeline versions can be defined based on a single pipeline JAR file. However, two instances of the same pipeline version (and pipeline version ID) cannot run at the same time.
Follow the steps below to create a new pipeline version.
-
In the
pipeline-config.conffile, specify the mapping from the input catalog's fixed identifier to catalog HRNs.Note
Input and output catalogs should be created within the project. If you use public catalogs then you need to link these catalogs to your project using the
olp project resource linkcommand.Example
pipeline-config.conffile:pipeline.config { output-catalog { hrn = "hrn:here-cn:data::org:example-output" } input-catalogs { optimized-map { hrn = "hrn:here-cn:data::org:here-optimized-map-for-location-library-2" }, sensor-data { hrn = "hrn:here-cn:data::org:olp-sdii-sample-berlin-2" } } }Note
Fixed identifiers
Pipeline implementations may bind to and distinguish between multiple input catalogs via the fixed identifiers. Fixed identifiers are defined in a pipeline template. In contrast, HRNs are defined for each pipeline version, so that the same pipeline template may be reused in multiple setups.
-
Enter the 'olp pipeline version create` command and specify the version name, pipeline ID, pipeline template ID, and the path to your
pipeline-config.conffile.LinuxWindowsolp pipeline version create example-pipeline-version <YOUR_PIPELINE_ID> \ <YOUR_PIPELINE_TEMPLATE_ID> /user/data/pipeline-config.conf --scope <YOUR_PROJECT_HRN>olp pipeline version create example-pipeline-version <YOUR_PIPELINE_ID> ^ <YOUR_PIPELINE_TEMPLATE_ID> /user/data/pipeline-config.conf --scope <YOUR_PROJECT_HRN>For more information on pipeline configuration, see Pipeline Configuration.
Note down this version ID, as you need it later in the workflow.
-
To verify your pipeline version, enter the
olp pipeline version showcommand.LinuxWindowsolp pipeline version show \ <YOUR_PIPELINE_ID> <YOUR_PIPELINE_VERSION_ID> --scope <YOUR_PROJECT_HRN>olp pipeline version show ^ <YOUR_PIPELINE_ID> <YOUR_PIPELINE_VERSION_ID> --scope <YOUR_PROJECT_HRN>The command displays the following results.
   Details of the olpclitestpipe pipeline:
   ID                                 51e86a6c-a99c-450a-9e06-1b5609932ce9
   version number                     1
   pipeline template ID               ac42c041-98ff-43d9-b0c3-0002fa756f49
   output catalog HRN                 hrn:here-cn:data::org:example-output
   input catalogs                     {"optimized-map":
       ID                            HRN
       optimized-map                 hrn:here-cn:data::org:here-optimized-map-for-location-library-2
       sensor-data                   hrn:here-cn:data::org:olp-sdii-sample-berlin-2
   state                              ready
   created                            2018-04-13T13:00:45.909Z
   updated                            2018-04-13T13:01:18.346Z
   high availability                  false
   multi-region enabled               false
   schedule                           none
   workers                            1
   worker units                       1
   worker resource profile         HS1B
   supervisor units                   1
   supervisor resource profile     HS1B
Activate a pipeline version
To execute a pipeline, one of its pipeline versions must be activated.
To activate the pipeline version, perform an Activate operation on the pipeline version ID. A batch pipeline can be activated to run On-demand (Run Now) or it can be Scheduled. With the Scheduled option, the batch pipeline version can be executed when the input catalogs are updated with new data or based on a time schedule.
Enter the olp pipeline version activate command and specify both your pipeline ID and pipeline version ID to activate the pipeline version to run On-demand.
Linux
Windows
olp pipeline version activate \
    <YOUR_PIPELINE_ID> <YOUR_PIPELINE_VERSION_ID> --scope <YOUR_PROJECT_HRN>
olp pipeline version activate ^
<YOUR_PIPELINE_ID> <YOUR_PIPELINE_VERSION_ID> --scope <YOUR_PROJECT_HRN>The command displays the following results.
Pipeline version has been activated
Current state: scheduled
You can monitor the state of a pipeline version in one of the following ways:
- Using the
olp pipeline version showcommand - Using the Logging URL to the Splunk service, which you can display with
olp pipeline version showcommand - Using the
Flink UIfor stream pipelines andSpark UIfor batch pipelines, you can get in thepipeline UI URLfield from theolp pipeline version showcommand - Using the
olp pipeline version waitcommand to wait for a pipeline job to reach a desired state
A pipeline without scheduler should transition to running state soon after activation, and then to ready state when execution finishes. A pipeline with scheduler will wait in scheduled state for one of its input catalogs to change and then transition to running state. After execution it will transition back to scheduled state.
To get a full list of the available commands, enter olp --help.