- Products ProductsLocation Services
Solve complex location problems from geofencing to custom routing
PlatformCloud environments for location-centric solution development, data exchange and visualization
Tracking & PositioningFast and accurate tracking and positioning of people and devices, indoors or outdoors
APIs & SDKsEasy to use, scaleable and flexible tools to get going quickly
Developer EcosystemsAccess Location Services on your favorite developer platform ecosystem
- Documentation
- Pricing
- Resources ResourcesTutorials TutorialsExamples ExamplesBlog & Release Announcements Blog & Release AnnouncementsChangelog ChangelogDeveloper Newsletter Developer NewsletterKnowledge Base Knowledge BaseFeature List Feature ListSupport Plans Support PlansSystem Status System StatusLocation Services Coverage Information Location Services Coverage InformationSample Map Data for Students Sample Map Data for Students
Deployment
Deploying a Pipeline
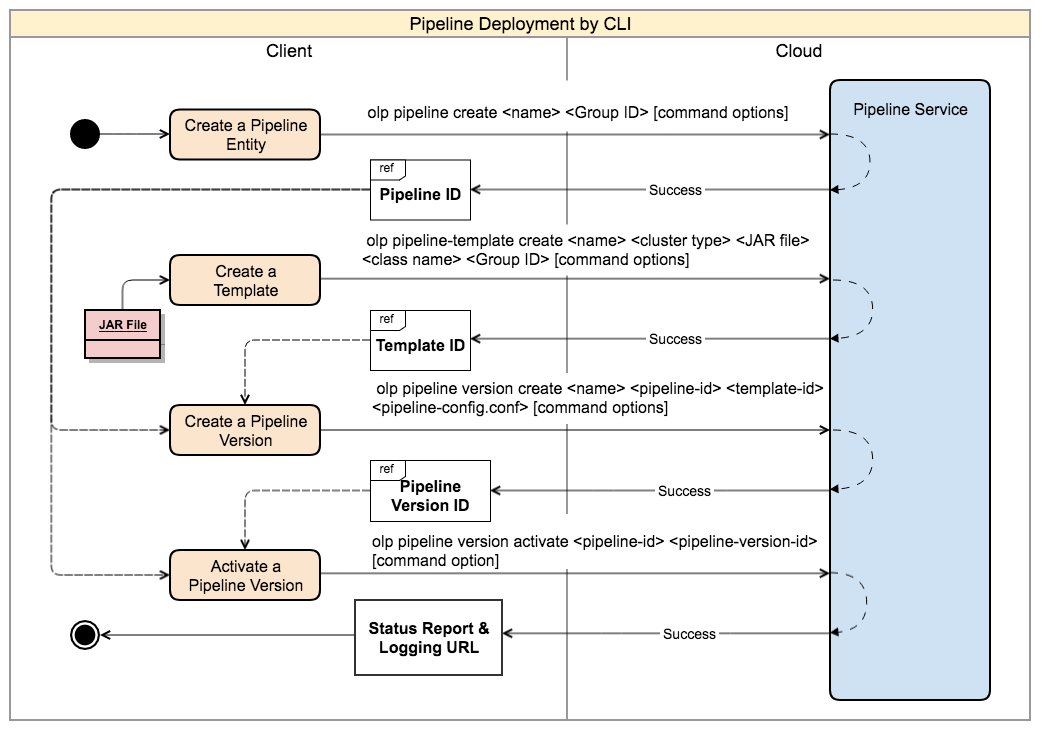
Deploying a pipeline to the HERE platform pipeline involves the following tasks:
- Create a Pipeline Object to which the pipeline service assigns a Pipeline ID (requires the pipeline-name, and group-ID).
- Select the pipeline JAR file to be deployed. (Filename cannot exceed 200 characters. File size cannot exceed 500MB.)
- Create a Template Object to hold the default run time information (referencing the pipeline JAR file, the input and output catalogs, the billing tag, and so on) and let the pipeline service assign it a Template ID (this is where the JAR file is uploaded to the pipeline service).
Note
If template creation cannot be completed within 50 min, the POST transaction connection is closed by the remote host and returns an error.
- Create the Pipeline Version (where the pipeline service assigns a Pipeline Version ID to the combined template and uploaded JAR file).
- Activate the Pipeline Version. This requires specifying the pipeline ID, the pipeline version ID, and, optionally for scheduled batch processing, if it has a
pipeline-jobs.configfile and its location.
Deployment can be done from the platform portal, the CLI, or the REST API. The deployment process illustrated in Figure 1 is done manually using the Command Line Interface (CLI).

This illustration focuses on a single pipeline. Real-world scenarios may deploy multiple pipelines that function together in complex data workflows that we refer to as a topology.
This illustration also does not address the deployment of pipelines via the platform portal UI or from within an application directly using the API. Instead, we have focused on this manual deployment process using the CLI to specifically illustrate the steps that must be executed to effect a deployment. Even if you are using the platform portal or the API directly, the same basic sequence of events must be followed. For additional information, see Deployment by API or Deploying a Pipeline.
For details about pipeline configuration files and their parameters, see Interfacing the Pipeline Process.
For details on configuring checkpoints and savepoints, see Restoring a Stream Pipeline from a Snapshot and Externalized Checkpoint Feature.
Post Deployment
After you deploy the pipeline, it is ready to run and process available data. Activating the Pipeline Version initiates running the pipeline. Pipeline activity is logged as data is processed and processed data is sent to the output catalog. Normal monitoring can take place at this time. It is also possible to issue operational commands to an individual pipeline based on its Pipeline Version ID. The available commands are described in detail in the OLP CLI User Guide. Alternately, operational commands can be issued to the pipeline version through the platform portal. For more information, see Using the Web Portal for Pipelines.